Toward Autonomous Drones Under $200
Toward Autonomous Drones Under $200
- Last Updated: December 2, 2024
Guest Writer
- Last Updated: December 2, 2024

From mythical flying horses to da Vinci to the Wright brothers, we have always held a special place in our hearts for flying objects. Thanks to science and technology, our fascination with angels have been replaced with that of autonomous drones—machines that are capable of flying by themselves.
Building an autonomous drone, or even understanding them, can be quite daunting. So let’s break this down!
The Drone
We would first need to build a standard radio controlled drone. Starting with the frame, the f450 frame by DJI seems to be the most reliable. The DJI frame on my drone survived a 300 feet free fall. It's quite durable!
We would then need motors and some electronic speed controllers. Since we will be using the f450 frame, which has a payload of about 2 kilograms, we need to be using brushless motors that have a rating of at least 920kV with some 10-inch propellers. Any 30A ESCs would suffice for this project. A 30C lithium polymer battery above 2300mAh would give the drone 10+ minutes of flight time.
Flight Control
The most important part of this standard drone build is the flight controller. Flight controllers designed specifically for autonomous missions could be chosen, but that would defeat the very purpose of this post—building autonomous drones on the cheap.
Using some basic inexpensive flight controllers like the KK2.0 board or the CC3D by OpenPilot (below) would be a better and more fun option. Next up, we need a 6-channel radio controller like this one from FlySky to complete the basic build. Even though we would only be using four channels out of the six, the extra two could help interface some other control, controlling, for example, a camera gimbal.
[caption id=" align="aligncenter" width="800"]
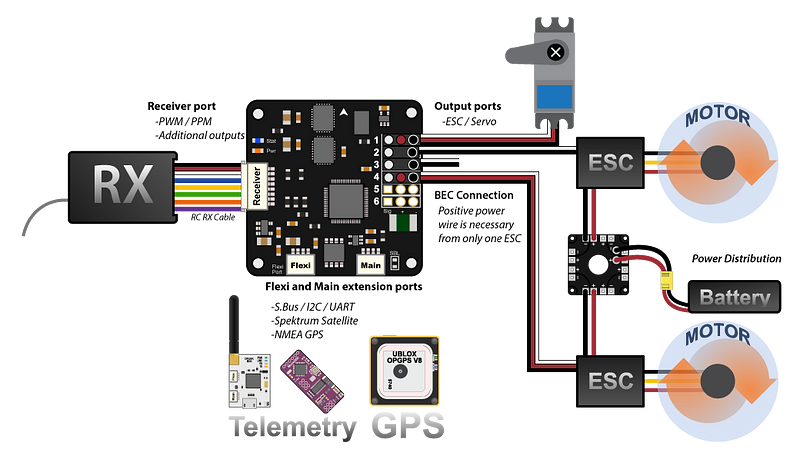
Once everything is connected and the flight controller is set-up, we're just about ready for takeoff!
[embed]https://youtu.be/ZK7IkctChu8?list=PLLbz0J-_liAEL5PA2w_dZVrQGL6mk5ftI[/embed]The first step toward automating your drone would be replacing the radio with an onboard computer. Speaking of onboard computers for the drone, I hope that a Lenovo Thinkpad would not be the first thing that pops to mind! Rather, we can make good use of the Raspberry Pi here.
An Arduino would perform in this situation, although it isn't a computer but a micro-controller. I've tried and tested both the Arduino and the Pi for drone applications. I think that the Pi is best suited to the task of making the drone autonomous because of its greater computational power and flexibility.
How does replacing the radio with the Pi help us achieve our goal of autonomous flight? Well, with the Pi we can connect a wide range of external sensors to the drone. We can also run various mapping, localization, and/or image processing algorithms from the resulting sensor data. Basically, we can do all the fun stuff!
The first order of business, however, is to mimic the radio transmitter signals that served as inputs for the flight controller.
[caption id=" align="aligncenter" width="800"]
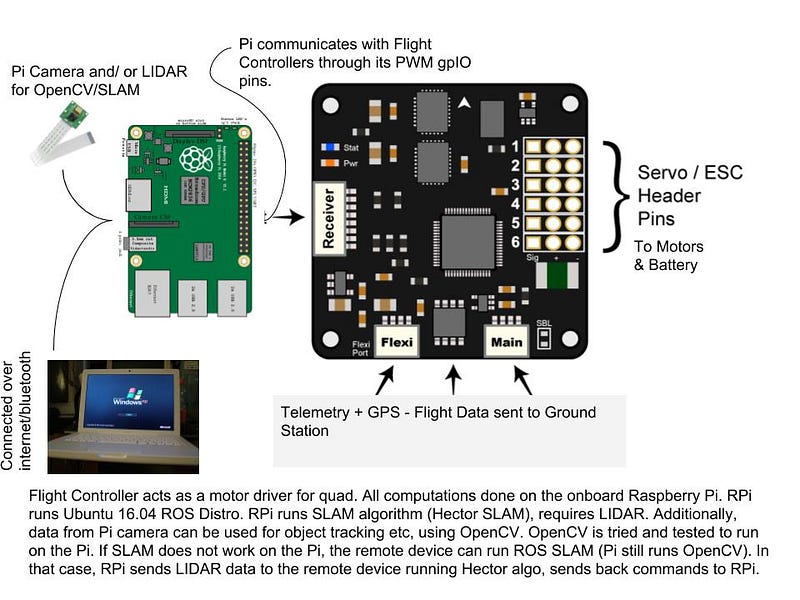
Mimicking the Radio Signals
In order to interface the Raspberry Pi with the flight controller, we need to use the PWM function of the gpIO pins on the Pi. Use the code here as a reference. Once you're done with the code, open up the latest LibrePilot (previously known as OpenPilot) Ground Control Station and configure the inputs from the Pi to different channels that correspond to throttle, pitch, yaw, and roll.
Next, follow the normal radio controller calibration procedure with the Pi. We should now be all set to use the Pi for sending commands to the Flight Controller, which controls the movement of the drone.
Our setup could be expanded by using a mobile device that sends specific commands to the drone. I made this android app that sends specific commands to the drone, to take off, land, arm, disarm, etc. I explain all of this in the documentation, which is included with the app linked above. This advancement enables the user to fly the drone in a more controlled and guided manner, increasing safety and stability.
At this point, the drone can be controlled by a mobile application through Bluetooth, or any form of communication for that matter, while the onboard Raspberry Pi can now be used for all the “fun stuff.”
Autonomous Flight: The Fun Stuff
In this model, the flight controller acts as a mere motor control unit that flies and balances the quadcopter. This means that the Raspberry Pi could be used as the brain of our drone while the flight controller handles all of the electronics. Using the Raspberry Pi, we can add a range of diverse external sensors that can aid our drone’s flight.
A cheap ultrasonic sensor can be placed at the bottom of the drone to maintain a constant height at all times. With four more ultrasonic sensors at the front, back, and sides, our drone could avoid any obstacles in its way and even go over obstacles that are under its body (e.g. stairs).
https://youtu.be/Z_zV532d5oQ?t=104A laser range finder, such as the one in the above video, could also be used instead of the ultrasonic sensors. The laser rangefinders might be more costly, but they're also more accurate. It's a tradeoff.
OpenCV for Image Processing
Going a step further, we could use a webcam that may have been laying in our basements since the early 2000s. Real-time image processing can be easily implemented on the Pi using OpenCV. OpenCV is a powerful, open source tool that can be used for image recognition, object tracking, etc. By using this tool, our drone can also be used for advanced applications such as rescue or search operations, in which a specific target needs to be followed or found. This could be achieved using OpenCV.
Implementing ROS
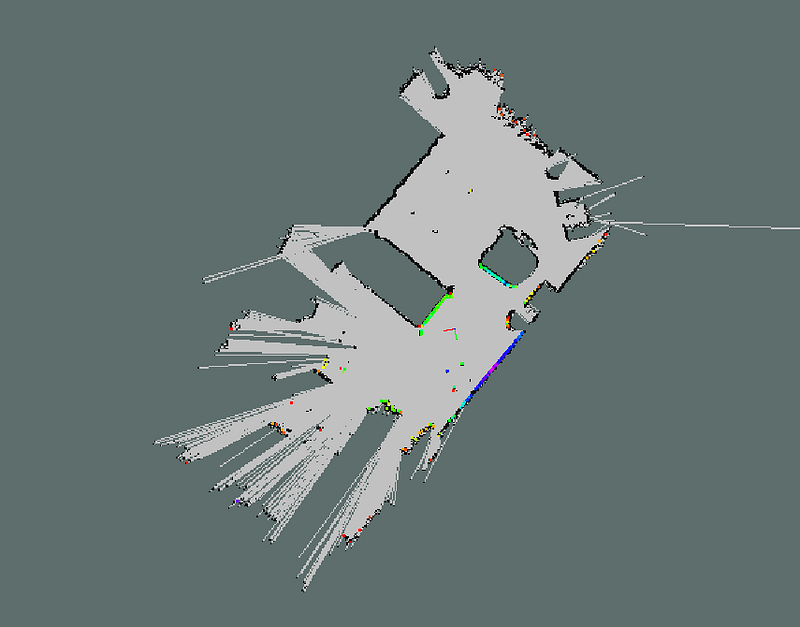
The Raspberry Pi can also run ROS—an environment specially made for robotics applications. ROS has many important libraries that mainly target and improve autonomous navigation. Using Simultaneous Localization And Mapping, or SLAM, we could empower our drone to navigate an unknown environment. This would require advanced LIDARs, which in principle are high-speed 360-degree laser scanners. Once equipped with the LIDARs, the drone could be used in any environment. Using SLAM algorithms, the Raspberry Pi would create a 2D map of its environment and then navigate through it. This has huge applications in autonomous indoor flying because GPS is unreliable indoors due to satellite signal attenuation.
[caption id=" align="aligncenter" width="800"]
Affordability
Excluding the LIDAR, everything else we discussed here costs well under $200, which is less than the price of a PS4 (and way more fun!). This model provides a great learning experience with the possibility of implementing advanced applications in contrast to the costlier ready-to-fly drones.
With the Raspberry Pi in place of the radio, applications targeting automation become easier with more stabilized control and safer flights.
And, that is it! Toward autonomous drones under $200!
A version of this article was originally published by Mukut Mukherjee, a student at WW-P High School North, on Medium.The Most Comprehensive IoT Newsletter for Enterprises
Showcasing the highest-quality content, resources, news, and insights from the world of the Internet of Things. Subscribe to remain informed and up-to-date.
New Podcast Episode

The State of Smart Buildings
Related Articles


Related Solutions

Retail Shelf Utilization Monitoring
Improve inventory management, boost revenue, optimize staff efficiency, and enhance customer experience.
Improve inventory management, boost revenue, optimize staff efficiency, and enhance customer experience.
Leverege
Leverege

Bottom of Basket for Grocery Stores
Enables grocery stores to automatically detect bottom cart items, alert cashiers and help reduce shrinkage
Enables grocery stores to automatically detect bottom cart items, alert cashiers and help reduce shrinkage
Leverege
Leverege

Service Intelligence for Auto Service Providers
Gain insights into bay utilization, crew performance, and improve customer satisfaction
Gain insights into bay utilization, crew performance, and improve customer satisfaction
Leverege
Leverege
Related Solutions
Retail
Retail Shelf Utilization Monitoring
Improve inventory management, boost revenue, optimize staff efficiency, and enhance customer experience.
Leverege
Retail
Bottom of Basket for Grocery Stores
Enables grocery stores to automatically detect bottom cart items, alert cashiers and help reduce shrinkage
Leverege
Automotive
Service Intelligence for Auto Service Providers
Gain insights into bay utilization, crew performance, and improve customer satisfaction
Leverege