How to Connect an iOS App to AWS IoT
How to Connect an iOS App to AWS IoT
- Last Updated: December 2, 2024
Josh Perry
- Last Updated: December 2, 2024

This post describes how to connect an iOS app via MQTT (websocket) to AWS IoT, without requiring users to be authenticated with AWS Cognito, generating unique X.509 certificates in each distribution of the app or using AWS Amplify. This article presents a quick, lightweight solution.
Quick disclaimer: Those that follow me for motivational content, this isn’t it, unless coding leaves you inspired. 😉 This post is about software development.
Existing solutions
As far as I’m aware, there are two other methods of achieving this that cater to different Applications. They are:
- Authenticate users with an AWS Cognito User Pool and then use the AWSMobileClient ID to authenticate with AWS IoT. If this is for you, use this Amplify resource.
- Using X.509 certificates to authenticate with AWS IoT. Use this Github resource.
My Applications
The above methods did not match my requirements which were characterized by the following:
- Swift (excuse the pun 😱) app responses in realtime to events generated by IoT sensors.
- Expedite integration with AWS IoT and keep the code lightweight (less error-prone). This included a reluctance to include all the boilerplate/overhead that comes with a comprehensive service like AWS Amplify (nothing against it, I just didn’t need it).
- Avoid AWS Cognito Auth: My app already had a different auth system implemented.
- Avoid generating X.509 certificates for every new iOS client coming online and avoid interfacing with the iOS keychain.
- A desire for mobile clients to access AWS IoT in the same manner as a backend AWS component would, hence an AWS Cognito Identity Pool was perfect. Read why here.
So, if your Applications is similar to mine, read on to find out how to connect your iOS app to AWS IoT quickly and simply.
Want to connect your iOS app to AWS IoT? You can connect an iOS app via MQTT (websocket) to AWS IoT without requiring users to be authenticated with AWS Cognito using AWS Amplify.

Create a Cognito Identity Pool in AWS
Follow these steps to create a Cognito Identity Pool:
- Head over the Cognito service in the AWS Console.
- Select Manage Identity Pools (The AWS console frequently changes, so if you’re reading this after a change, look for the keyword identity and not user.)
- Create a new Identity Pool and give it a name.
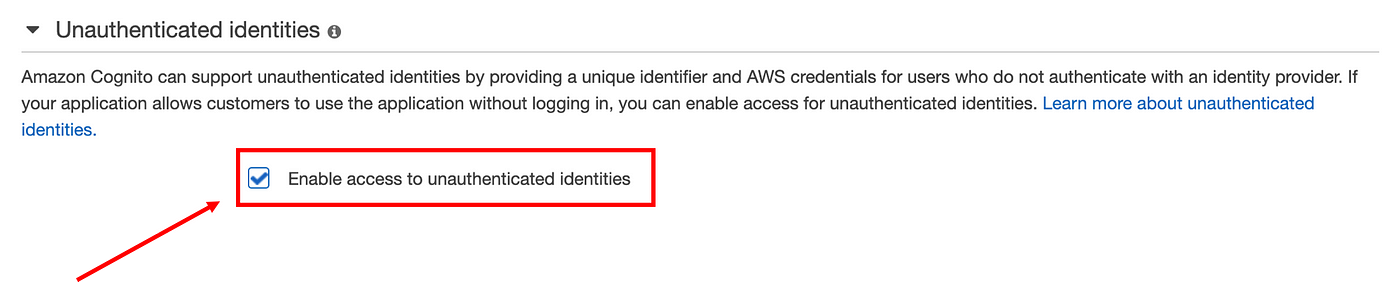
- Tick the box enabling service access for unauthenticated entities.
- Create the pool.
- Allow access to your resources — this will create and attach IAM (Identity Access Management) policies for both authenticated and unauthenticated users.
Make Note of Identity Pool ID + Region
The only two informational pieces you’ll need from this process are:
- Identity Pool ID —
aws-region:uuid(where uuid = 36 character unique identifier - AWS region — where the Identity Pool was created.
The Identity Pool ID can be copied from the sample code, as can the region, as a typedef from the AWSCore module.
IoT Access Policy
Now we need to give our Identity Pool permission to access IoT core.
A quick note on AWS IAM (Identity and Access Management) for anyone who is new/confused. Here’s a serious, but useful oversimplification: there are two fundamental concepts:
- Roles - Entities that interact with your AWS cloud (could be a server, developer, lambda function etc).
- Policies - A set of access rights that an entity (role) can use to access AWS services.
Think of a role as a person who has a specific job, i.e. a cook who’s in charge of dicing onions. Each role carries an "access card’" with a list of privileges on it. Think of a chopping policy as a line item on the card that allows them access to (a) a sharp knife and (b) a chopping board. Here are the docs from AWS.
Head over to IAM in the AWS console and follow these steps to add IoT access:
- Find the two roles that were created for authenticated and unauthenticated users. They should have followed the naming convention:
Cognito_YourPoolNameAuth_RoleandCognito_YourPoolNameUnauth_Role - Click on each of them in turn and select Attach Policies.
- From here you need to decide what level of IoT access you want to provide users of your iOS app. I use AWSIoTDataAccess, but that’s appropriate for my Applications. If you’re unsure and not worried about breaking anything (i.e. non-safety critical app) you can select AWSIoTFullAccess and you’ll never get permission denied errors. After addition, you should see the policy listed for the role [see below].
- Select and attach an IoT policy to both roles.

iOS Integration with AWS IoT
Connecting an iOS app the AWS IoT requires the following:
- Install the AWSIoT module.
- Initialize AWS Credentials using the Identity Pool and an AWSIoTDataManager using these generated credentials.
- Fetch a client ID to authenticate with AWS IoT.
- Establish an MQTT connection via a WebSocket to AWS IoT.
- Publish/Subscribe to topics.
1. Install AWSIoT Module
I really like Cocoapods as a dependency manager for iOS, and, if you're unaware, I highly recommend checking it out.
If you have Cocoapods installed, add:pod 'AWSIoT’ (this will automatically add AWSCore as it’s required by AWSIoT) and $ pod install to update your dependencies.
Obviously, use the dependency manager you prefer. Explaining the function of these is outside the scope of this article.
2. Credential & AWSIoTDataManager Initialisation
In whichever class or file you want to write your IoT interfacing code, import the AWSIoT module:
import AWSIoT
The following piece of code will generate credentials used to initialize the AWSIoTDataManager:
Earlier you made a note of your Identity Pool ID and AWS Region, this is where you bring them out. Insert them into the code above.
Next is the initialization of the AWSIoTDataManager. The data manager provides a mechanism for connecting, publishing, subscribing and modifying thing shadows, so it’s perfect for facilitating the connection between your iOS app and your fleet. Here’s the SDK documentation on the class.
To access your IoT Endpoint: in the AWS console go to IoT Core → Settings and you’ll find it at the top of the page. Be sure to prefix the string with wss:// and suffix it with /mqtt .
3. Get Client ID
In order to authenticate with AWS IoT, a client ID is required. This can be acquired via an AWSCredentialsProvider object using the getIdentityId()method.
Calling this method returns an AWSTask<NSString *> object, which is the AWS SDK’s mechanism for handling asynchronous tasks. In my app, I wrote a function with a promise wrapper to return the client ID, but explaining that is beyond the scope of this article, so I’ll simply illustrate how to fetch the ID using a completion handler. You can modify the asynchronous return however you wish.
4. MQTT Connection Via a Websocket to AWS IoT
The following function assumes a successful acquisition of a client ID and illustrates how to connect to AWS IoT:
Debugging connection errors
This method is extremely information sparse in error conditions and hence debugging can be difficult. I haven’t had many issues myself, but if they occur for you, my recommendation would be to inspect the AWS object instances in the code and ensure they're not incorrectly initialized. Failing this, consider peripheral events to give you insight. Likely causes of connection failure are auth issues — incorrect or improperly created or attached policies or incorrect region/identity pool ID.
5. Publish/Subscribe to Topics
Once a successful connection is established, it becomes possible to publish and subscribe via the AWS IoT MQTT message broker (which is called the ‘Device Gateway’).
The above function registers subscriptions to an array of topics, handling reception via an inline function.
The AWSIoTDataManager methods to publish a message are very simple, and different options are offered between publishing a data/string payload and taking an ackCallback argument — 4x (2²) permutations of these. A simple example of publishing a string is shown below.
The AWSIoTDataManager class is fairly well documented. You can explore the full feature set here.
Other IoT Capabilities
Depending on your requirements, there are many more capabilities of the AWS iOS SDK in the realm of IoT. Many relate to platform and device management. You can explore all the IoT related functionality in the SDK documentation. If you do want to do more with your iOS app, remember to ensure your Cognito Identity Pool has an appropriate IoT policy attached to its roles.
That’s it!
Thanks for reading, I really hope you managed to connect your app without too many headaches. If you have any questions please drop them in the comments. I’m also always looking to improve, so any constructive criticism/feedback from experienced engineers/devs would be greatly appreciated!
This post was originally published by Josh Perry on Medium.
The Most Comprehensive IoT Newsletter for Enterprises
Showcasing the highest-quality content, resources, news, and insights from the world of the Internet of Things. Subscribe to remain informed and up-to-date.
New Podcast Episode

Can AI Design IoT Hardware?
Related Articles


Related Solutions

Emergency Department Workflow Management
Gain a complete view of patient flow, staff activity, and resource availability to reduce wait times, improve satisfaction, and optimize throughput.
Gain a complete view of patient flow, staff activity, and resource availability to reduce wait times, improve satisfaction, and optimize throughput.
Vizzia Technologies
Vizzia Technologies

Sewer Level Monitoring
Real‑time sewer level data and early alerts to prevent overflows, prioritize maintenance, and proactively manage networks.
Real‑time sewer level data and early alerts to prevent overflows, prioritize maintenance, and proactively manage networks.
Kallipr
Kallipr

Asset Performance Management for Manufacturers
Monitor, manage, and optimize your equipment with real‑time health checks, predictive maintenance, and lifecycle tracking.
Monitor, manage, and optimize your equipment with real‑time health checks, predictive maintenance, and lifecycle tracking.
IoT83
IoT83
Related Solutions
Healthcare
Emergency Department Workflow Management
Gain a complete view of patient flow, staff activity, and resource availability to reduce wait times, improve satisfaction, and optimize throughput.
Vizzia Technologies
Utilities
Sewer Level Monitoring
Real‑time sewer level data and early alerts to prevent overflows, prioritize maintenance, and proactively manage networks.
Kallipr
Manufacturing
Asset Performance Management for Manufacturers
Monitor, manage, and optimize your equipment with real‑time health checks, predictive maintenance, and lifecycle tracking.
IoT83