Microsoft's Azure IoT Edge Part 3: Real Devices
Microsoft's Azure IoT Edge Part 3: Real Devices
- Last Updated: December 2, 2024
Jared Porcenaluk
- Last Updated: December 2, 2024

Ok, so thanks to Part 2, you have a couple simulated devices sending data to the cloud, all on your development machine. Now you can just go ahead and set it in a corner and never use it again, as it will forever be your dedicated Azure IoT Edge device. No? You need that computer? Ok, let's figure something else out.
The next step on the journey is putting Azure IoT Edge on an actual, real device that you could install somewhere. As an example, we'll go ahead and install it on the beloved Raspberry Pi 3.
If you've never worked with a Raspberry Pi 3, no worries! It's really simple to start. First of all, you can just imagine the Raspberry Pi 3 as a super-small computer that happens to also have GPIO (General-Purpose Input/Output) pins so you can control things like motors and read stuff from sensors. It's easy to view the RPi as that, because that's what it is.
For $35 or so, you get an 1.3 GHZ quad-core ARM processor, a GPU, four USB ports, an Ethernet port, on-board WiFi and Bluetooth, and an HDMI out, as well as the aforementioned GPIO pins. It's a middle ground: it makes for a puny computer but a beefy IoT device.
This is a great place to be at if you want to run Microsoft Azure IoT Edge. You need enough power to run higher-level languages like C# or Java, but you don't need to run Crysis 3 with all the settings on high.
Prerequisites
- Raspberry Pi 3
- PC monitor with HDMI input
- HDMI cord
- Micro SD card (with whatever adapter you need to connect it to your computer)
- Micro USB cord
- USB power supply (5 volts, at least 2.5 amps)
- USB keyboard
- USB mouse
Setting Up The Raspberry Pi
After you've plugged in all the RPi peripherals and have a tiny computer with a rats nest of wires going to the mouse, keyboard, and monitor, you might be asking how we are going to put Windows on it.
Well, we're not. We're putting Raspbian on it, a flavor of Linux. Sneak attack! If you thought you were safe from the dark arts of Linux, what with this post being about a Microsoft product, you'd be sorely mistaken.
[bctt tweet="If you cover your ears and close your eyes when you hear "Linux," no worries." username="iotforall"]
Raspbian is a lightweight version of Linux specifically created for the Raspberry Pi. It has a simple installation process and a cute GUI, including a little desktop and some pre-installed games. No, this probably isn't what you'd want to use to run a highly critical IoT gateway, but it provides a good introduction to installing Microsoft Azure IoT Edge on a Linux device.
If you cover your ears and close your eyes when you hear "Linux," no worries. It's not my strong suit, either. If you feel more comfortable managing Windows devices, keep in mind that IoT Edge also runs in Windows environments. But, even Microsoft's docs seem to favor Linux for putting IoT Edge into production.
Even for Linux noobs, Raspbian is easy to install. In fact, you can use a bootloader called "NOOBS" to make the process a bit easier. The process is simple: you'll just be downloading the Raspbian NOOBS files, formatting your micro SD card, putting those files on it, and then plugging that SD card into your Pi and following the on-screen instructions.
To complete the process step-by-step, follow the Raspberry Pi quickstart guide.
Installing Azure IoT Edge
Once you've downloaded and installed Raspbian, it's time to install Azure IoT Edge. The process is much like it was before, except on Linux. You'll grab the latest files from the IoT Edge git repo and build the application. Remember, the IoT Edge git repo doesn't include compiled code so you have to do that part yourself.
No worries, it's even more simple on Linux than it is on Windows. Open the command line on the Raspbian desktop (it should be in the taskbar at the top) and follow these steps on Microsoft's IoT Edge docs site.
Once you've installed IoT Edge, you can do the same process as in the last part of this series, modifying the JSON file with the IoT Hub name and suffix, the device IDs and keys for the simulated devices, and the command to start and run the application is even the same.
What About Real Peripheral Devices?
So far, we've installed the same project on a Raspberry Pi, but we're still only using simulated peripheral devices. You can stick the RPi in a corner and it will generate fake peripheral device info and really send it to the cloud, but what about connecting it to real devices?
Stay tuned 'til next time, when we'll talk about real peripheral devices and bring intelligence from the cloud.
The Most Comprehensive IoT Newsletter for Enterprises
Showcasing the highest-quality content, resources, news, and insights from the world of the Internet of Things. Subscribe to remain informed and up-to-date.
New Podcast Episode

IoT Is Finally Delivering
Related Articles

Related Solutions
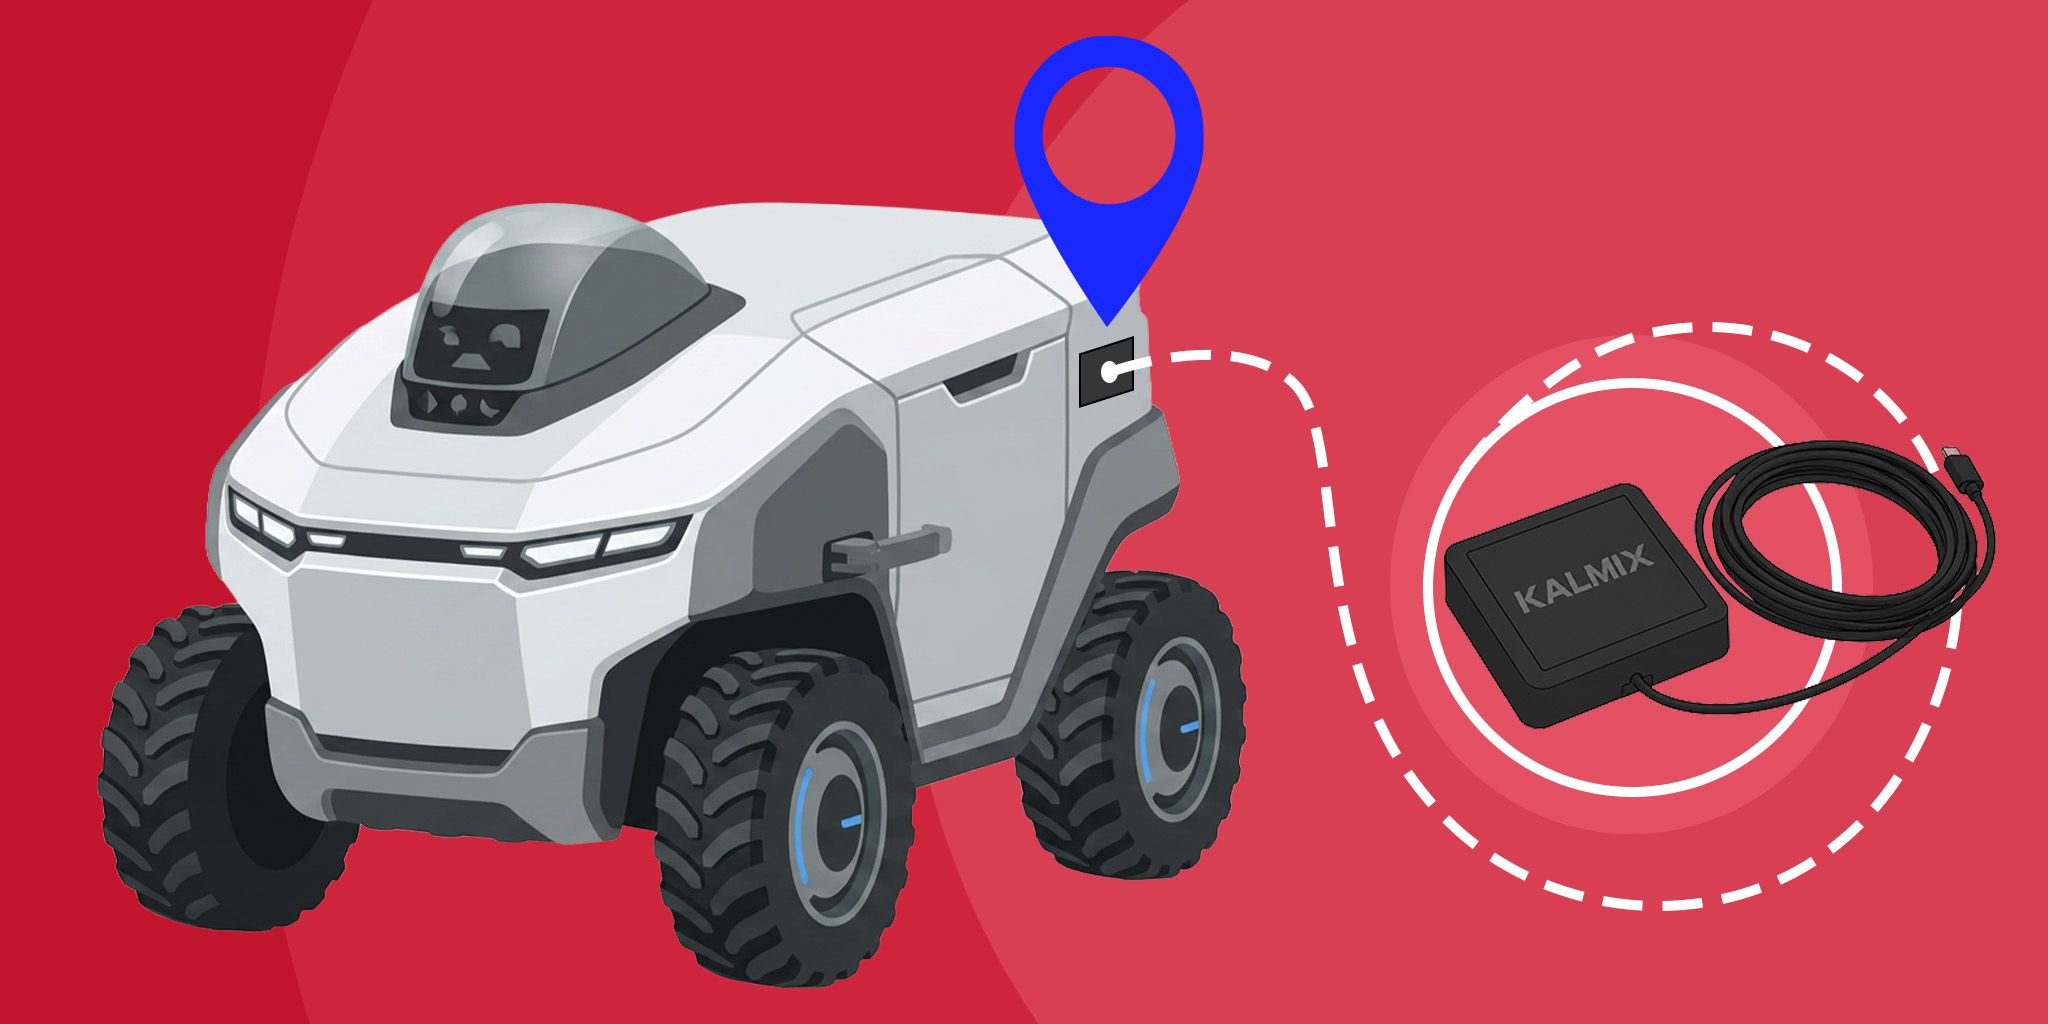
RTK Positioning for Robotics and Field Machines
High-precision positioning. Achieve centimeter-level accuracy without the complexity of building custom hardware from scratch.
High-precision positioning. Achieve centimeter-level accuracy without the complexity of building custom hardware from scratch.
Kalmix
Kalmix
Staff Management and Location Tracking for Coworking Spaces
Gain real-time visibility of third-party staff like security or janitors with BLE beacons and smart LTE badges.
Gain real-time visibility of third-party staff like security or janitors with BLE beacons and smart LTE badges.
Minew
Minew
Related Solutions
Industrial
RTK Positioning for Robotics and Field Machines
High-precision positioning. Achieve centimeter-level accuracy without the complexity of building custom hardware from scratch.
Kalmix
Buildings & Facilities
Staff Management and Location Tracking for Coworking Spaces
Gain real-time visibility of third-party staff like security or janitors with BLE beacons and smart LTE badges.
Minew