How to be Strategic about Building your IoT Prototype
How to be Strategic about Building your IoT Prototype
- Last Updated: December 2, 2024
Guest Writer
- Last Updated: December 2, 2024

“Plug it in, this time everything just might work!” is commonly spoken just before switching the power of a prototype on, only to see it catch on fire, begin convulsing, or much less spectacularly but much more commonly, do absolutely nothing.
Hmmfff! What did you miss this time?!
The fact is, creating an Internet of Things (IoT) prototype is one of the most rewarding, but also frustratingly challenging engineering processes there are.
It is rewarding because for the creative mind, the Internet of Things represents new and frontier opportunities to interact with the world around us – and for the world to interact with us – in novel ways.
It is challenging because IoT products – while appearing sleek and simple – are extremely advanced engineering projects that span many historically disparate disciplines: electrical engineering, firmware development, mechanical integration, wireless networking, mobile app development, server and database design, and cloud processing.
It is frustrating because we live in a world of gigabit internet and the ability to stream Netflix on a cellphone. How could reading/writing tiny pieces of data from my IoT device be HARD? IoT is constantly evolving, and keeping up with the newest tech can be downright disheartening.
Your IoT Prototype
Ok, so you have finished the ideation process and are ready to start building the prototype. Whether your ideation was on the back of a napkin, or through a detailed PDS (Product Design Specification), jumping directly into building a market-ready product is risky.
The unknowns are plenty: what features will your customers care about the most? What unexpected value items you design into your device will they simply dismiss? What will they demand that isn’t your product yet? What will be the most costly and difficult part of the design?
You may have some well educated and researched guesses, but the fact is you don’t know what you don’t know. Furthermore, making wrong guesses with IoT hardware can be much more costly than guessing incorrectly in software development, mainly due to the longer time required to “recompile” electronics.
It becomes vital to build a prototype design for feedback to begin testing some of these assumptions before expending the upfront costs of production, but oftentimes capital or time disallow you to remain in prototype-land for long. The solution to this sensitive and complex conundrum is strategic prototyping.
Now, the decisions you make as you set off with your prototype development will dictate if the prototyping process is painless, fast, and yields the information you are looking for; or if the process will take six-plus months and leave you with a sore forehead from banging your head against the multi-layered wall that is IoT hardware development.
The goal of this article series is to equip you with tools to be successful in your IoT prototyping.
There are great tools available for connected hardware development [more detail to come in part two of the series], and currently you don’t have to do much of the development yourself.
However, for every product development process, there has to be an informed captain at the wheel that understands where to start, what tools to use, and how to architect your prototype, allowing you to literally save MONTHS of development time.
Below, we will focus on deconstructing and understanding your IoT development needs to identify the primary goals of prototype, to become aware of the constraints, and to breakout the design into its functional pieces.
Anatomy of an IoT Prototype – The GCM Diagram
An IoT prototype will always have at least two, and usually three integrated interfaces:
- Physical hardware – The silicon, the wires, the solder, the nitty-gritty components that host your device’s sensors, modules, and functionality.
- A mobile application – That app you open on your mobile that lets you read your hardware’s sensor data, allows you to trigger functions, and helps you interface with your device.
- A web application – The cloud-connected and portable display of information that your device feeds to you. Also possible with web apps is a remote interface with your device, providing your device is Wifi enabled.
A key frustration that makes developing an IoT prototype so challenging is that the skillset required to create an interconnected program for a hardware device is very different from the skillset required to develop and maintain a web server, and vice versa.
This leaves a skilled software engineer floundering when approached with the task of developing a schematic for a hardware prototype, and an electrical engineer scratching their head when confronted with developing an industry standard iOS mobile application to control a device.
We've developed a methodology, we call it an anatomy, for an IoT prototype roadmap which we call the Goals-Constraints-Modules [GCM] Diagram.
Image Credit: Breadware
Below we are going to break down each of the pieces of the GCM Diagram. While it may initially look complex, it can be an extremely useful tool to put together a strategic prototyping roadmap quickly, and can substantially assist in identifying the key pieces of the prototype and the selecting the right tools to build your device correctly.
1. Goals
The first step in our prototype methodology is to concisely define your prototype and its purpose at an architectural level. This is the “Goals” section of the GCM Diagram.
Presumably you are building an IoT prototype because you are working to make something that doesn’t exist or is not easily attainable. What is it about your device that makes it special? What does it do? How does it work? We call this the “Goal” of the prototype, and its key to mapping out the flow of information within your device and its layers.
It turns out that even though an IoT prototype is complex, you can represent the information architecture – the “goal” – quite simply. Below are three examples showing Goals for three different IoT prototypes.
Here’s how to set the goals for your prototype. Look at each of the pieces of the prototype. Look at the physical device. What is its purpose? What is it doing? And how does it communicate with the mobile application and/or web application? Look at the mobile app and ask the same question. And again for the web application.
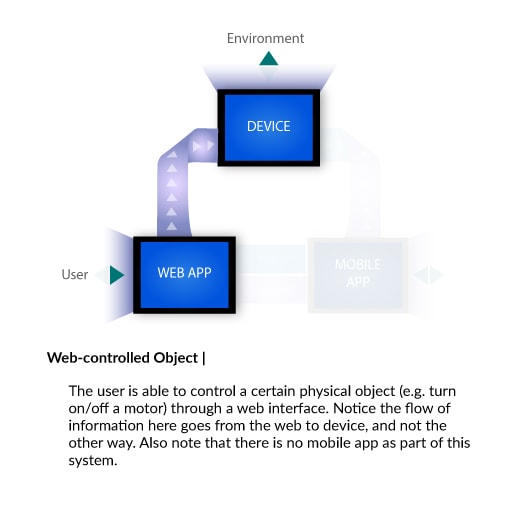
Image Credit: Breadware
2. Constraints
The goals sets the overall scope for the prototype, next it is important to understand what constraints exist upon your prototyping process and on the prototypes itself. This is the “Constraints” section of the GCM Diagram.
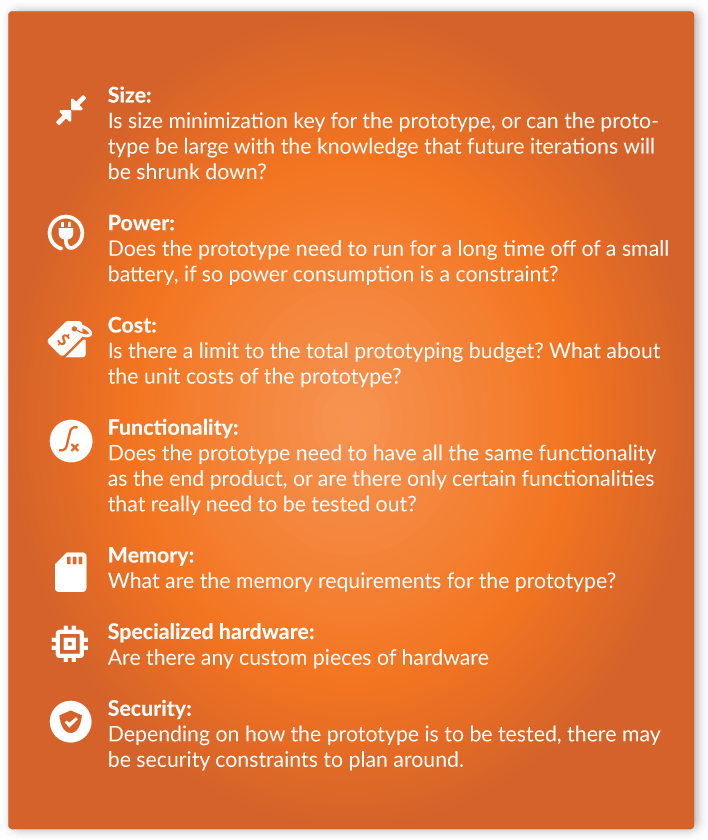
Image Credit: Breadware
These tend to be the common constraints for an IoT prototype however, further constraints specific to your prototype may be determined by asking the following questions:
What is the goal of the prototype – is it to do field testing to prove out the idea? Is it to show your managers/board to get approval for further funding? Is it to show investors to raise money? Or, is the prototype the end in itself?
Understanding what are the key constraint for the prototype, what are the secondary constraints, and what are non-issues will provide more clarity on how to approach the prototyping process.
3. Modules
Now that the goals and constraints have been defined for your prototype, the last planning stage is boil the prototype down into its functional pieces – this will provide clarity in selecting the right tools and hardware for the prototype. This is the “Modules” section of the GCM Diagram.
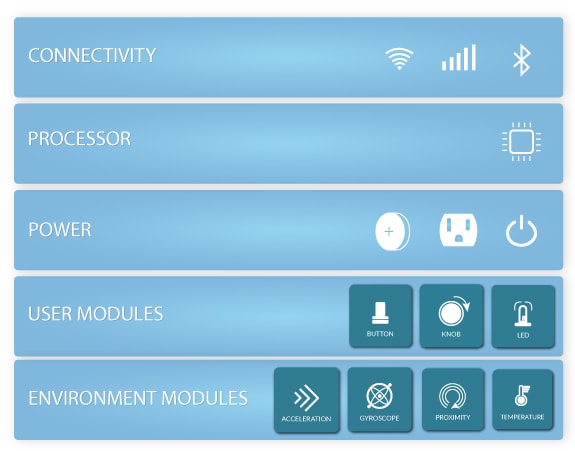
Image Credit: Breadware
All IoT products need at least one of the following elements:
- Communication module
- How does the device communicate to the internet?
- Power module
- How is the device powered?
- Processor modules
- What is executing the device firmware?
Further, most IoT products will have a variety of the following modules:
- User input/output modules
- Modules to allow for a user to physically interact with the device
- Sensory modules
- Modules to allow the device to record information about its surroundings
- Action modules
- Modules to allow the device to control surrounding objects
Let’s look at each of these module categories to get a sense of what modules may be right for your prototype.
Communication Modules
How is information going to be connected from your device to the internet? This can be performed either wirelessly or through a wired connection.
The most common wireless communication modules are:
- Bluetooth LE (BLE)
BLE is very lower power, doesn’t require any monthly fees, and allows for straightforward communication to mobile devices. The downside to BLE is that it has a limited range ~100 ft max and the bandwidth is limited (realistically less than 100 kbps). However, the range issue can often be solved using a BLE-WiFi or BLE-Cell wireless gateway hub. - WiFi
WiFi allows for a direct internet connection anywhere there is accessible WiFi coverage for the device. WiFi can be challenging to get configured correctly on an IoT device, but once set up it offers very high data rates relative to BLE. WiFi is higher power consumption than BLE, but also allows for higher data rates. - Cellular
The advantage of cellular connectivity is that it allows for much wider range of use than BLE or Wifi; anywhere where there is cell coverage your IoT prototype can communicate with the internet. The downside is that there are monthly data fees to the network carrier. We recommend avoided 2G implementations as it's being sunset in the US, instead look toward 3G solutions or the upcoming IoT-focused 4G-M solution.
Other less common communication modules that you may want to look into for you device
- USB – wired
- Ethernet – wired
- LoRa – wireless
- Zigbee – wireless
- Thread – wireless
- Z-Wave – wireless
Processor Modules
The processor is the brain of your prototype – an IoT device processor will typically be a low-power microcontroller.
There are three things to watch out for when selecting the processor:
- How much memory does the processor have AND is it suitable for your design
- What is the development environment for the microcontroller? Is it easy to use? Is it free?
- What are the hardware capabilities of your processor – does it have suitable communication interfaces
Common Processors for IoT prototypes are:
- Arduino
- RaspberryPi
- Breadware B-Line
- BeagleBone
- Texas Instruments
Power Modules
An IoT device is oftentimes low energy, but it still needs to be powered. There are a variety of power options – selecting the option appropriate for your prototype stems from the constraints you’ve identified in the GCM Diagram.
- Does the device need to be battery operated or can it be plugged in?
- If battery-operated, does the battery need to be rechargeable?
- If battery-operated, what is the necessary battery life?
Common power modules for IoT Devices are:
- Rechargeable LiPo (Lithium Polym) batteries – these are what are in cellphones
- Rechargeable/replaceable coin cells
- USB powered
- PoE (Power over ethernet) – often used in “smart homes”, “smart buildings”
- 9V Battery
- AA/AAA Batteries
User Input/Output Modules
There are several modules that allow for user interaction with the device.
Examples of user interaction modules are
- Buttons
- Switches
- Knobs
- LEDs
- Speakers
- LCD displays
- Touchpads
Sensor Modules
There are several modules that allow for the device to gather information from the surrounding environment.
Examples of environmental interaction modules are
- Temperature Sensor
- Accelerometer Sensor
- Gyroscope Sensor
- Brightness Sensor
- Humidity Sensor
- Camera
Action Modules
There are several action modules that allow for the device to alter states of the objects surrounding it
Examples of action modules are:
- Relays
- Motor controllers
- Sound amplifiers
- etc.
Summary
Prototyping is a critical piece of IoT product development. However, without properly defining the goals, constraints, and modules of your IoT prototype, determining how and where to start the prototyping process can be daunting.
Using the GCM process to predefine all pathways of your IoT prototype provides clarity on the prototype goals and can act as a compass in selecting the proper tools to rapidly get started in a rewarding and obstacle-free prototyping process.
Once all of the functional modules of the device are identified, scoping out the correct hardware from online vendors such becomes much quicker. We will take a deep dive into selecting right tools, platforms, and hardware for your IoT prototyping in Section Two of this series.
Written by Daniel Price, CEO of Breadware.
The Most Comprehensive IoT Newsletter for Enterprises
Showcasing the highest-quality content, resources, news, and insights from the world of the Internet of Things. Subscribe to remain informed and up-to-date.
New Podcast Episode

IoT Is Finally Delivering
Related Articles